Witch Legs Cake Jar
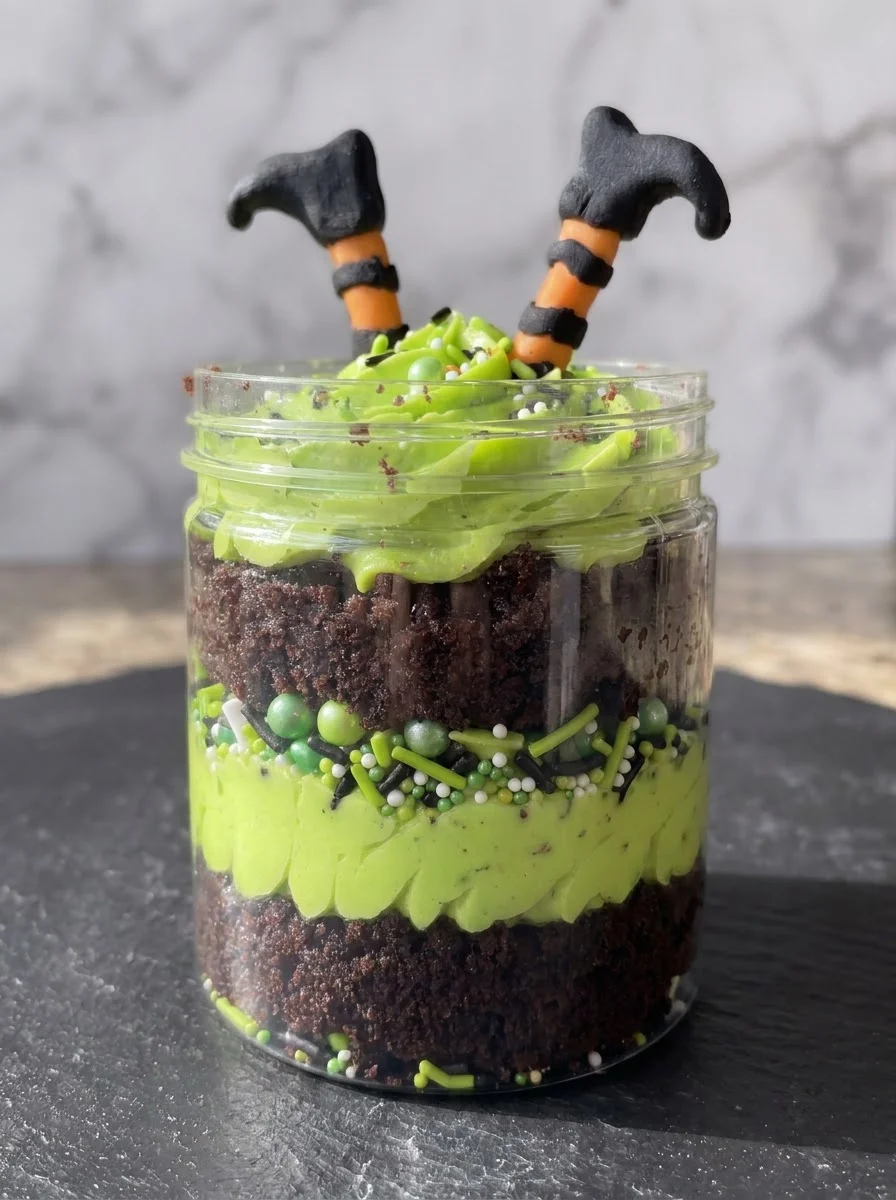
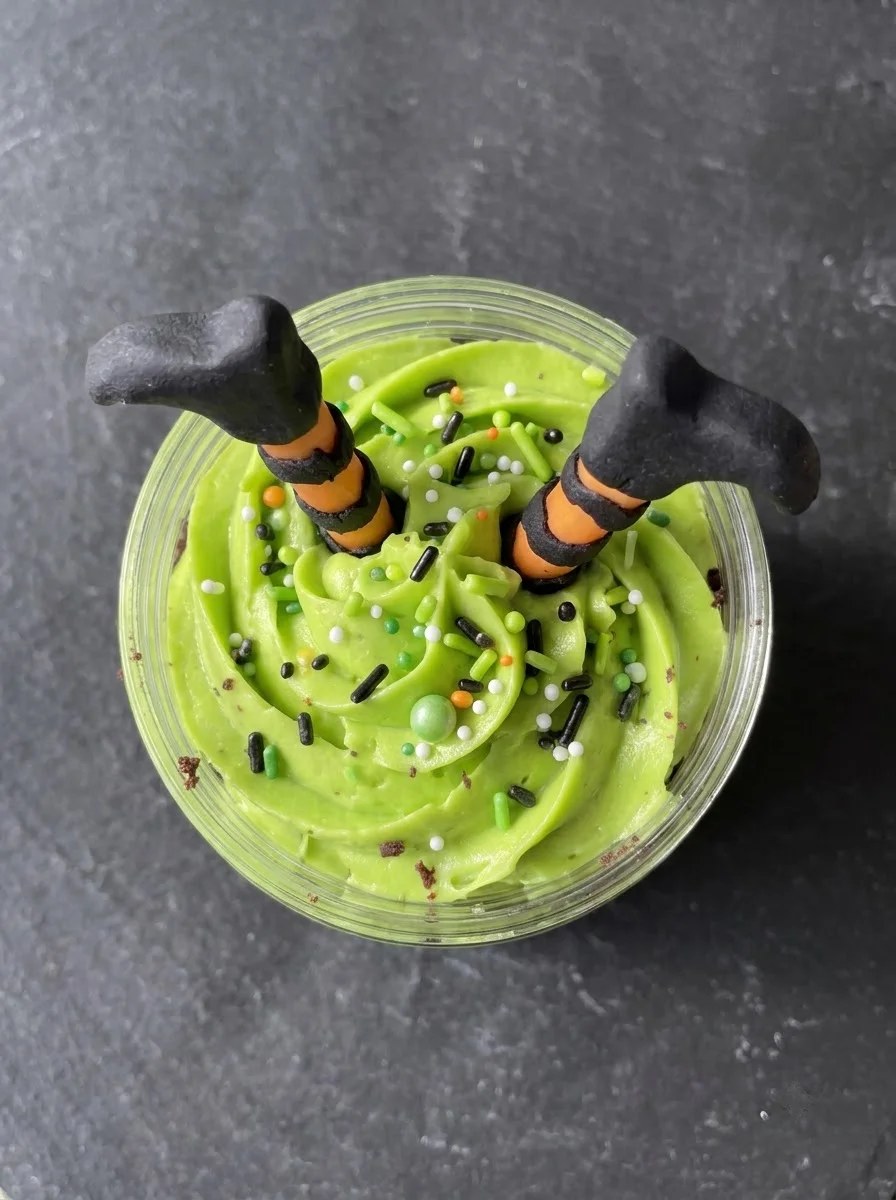
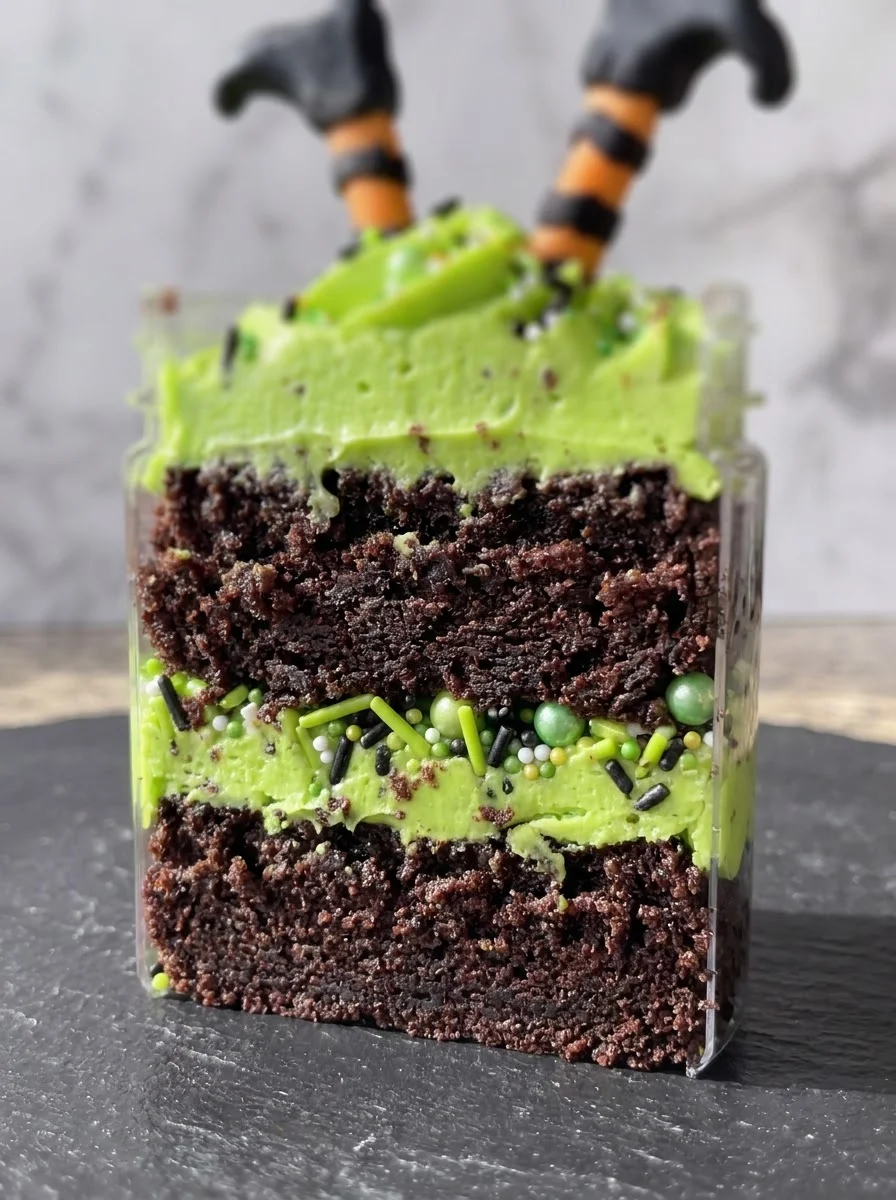
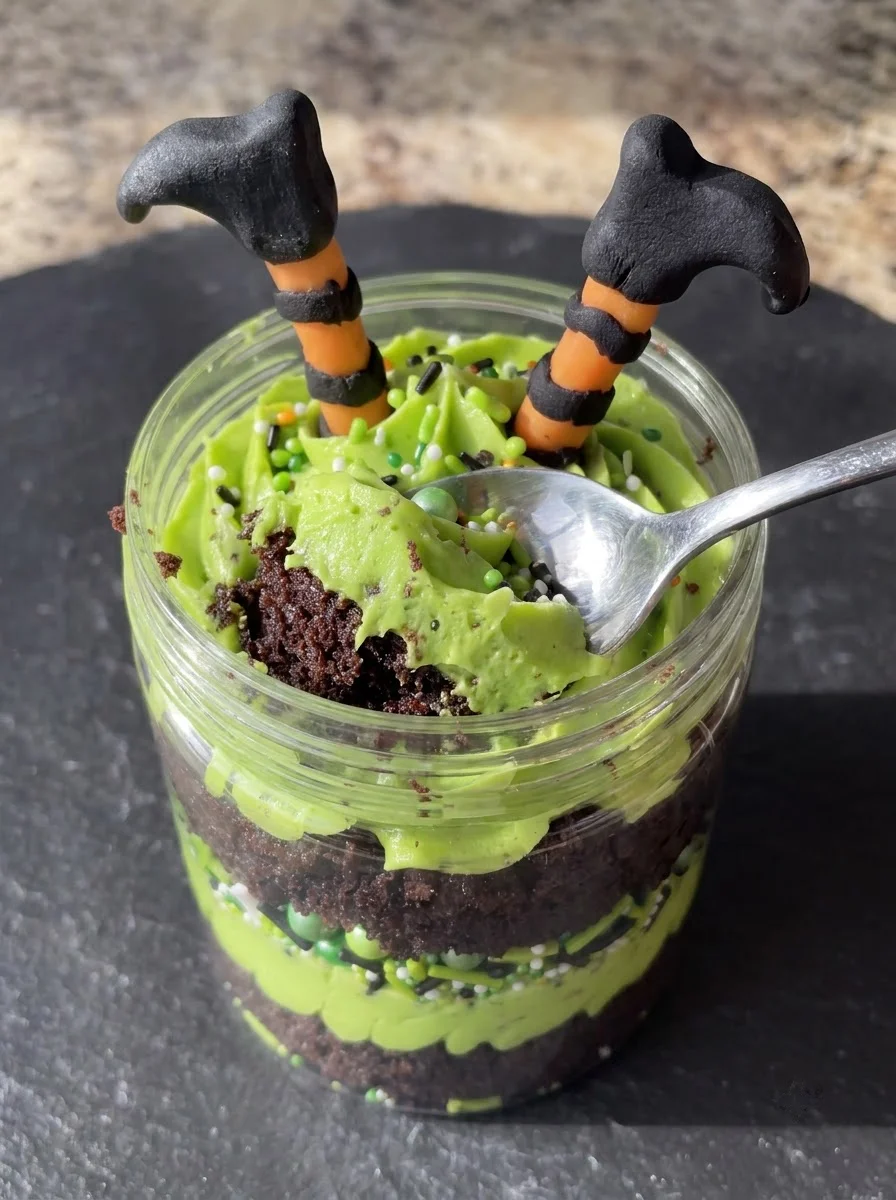
These whimsical Witch Legs Cake Jars are a delightful and spooky dessert, perfect for Halloween parties or festive gatherings. Each jar showcases layers of rich chocolate cake crumbs and vibrant green buttercream frosting. With playful witch leg decorations on top, these individual treats are as fun to look at as they are to eat. They’re a unique way to celebrate the season while satisfying sweet cravings!
Why You’ll Love This Recipe
- Easy to Assemble: With simple ingredients and straightforward steps, making these cake jars is a breeze even for novice bakers.
- Customizable Layers: You can adjust the layers of cake and frosting according to your taste, allowing for unique creations each time.
- Fun Presentation: Serving desserts in jars adds a charming touch that’s perfect for parties or gatherings.
- Perfect for Any Occasion: While ideal for Halloween, these cake jars can be adapted for birthdays, picnics, or any festive event.
- Deliciously Rich Flavor: The combination of chocolate cake and creamy green frosting creates an irresistible flavor that will delight everyone.
Tools and Preparation
Before you start baking your Witch Legs Cake Jars, gather all the necessary tools. Having everything ready will make the process smoother and more enjoyable.
Essential Tools and Equipment
- Mixing bowls
- Electric mixer
- 9×13 inch baking pan
- Piping bag with a large round tip
- Clear jars for layering
Importance of Each Tool
- Electric mixer: This tool makes whipping up the batter and frosting quick and easy, ensuring a smooth consistency.
- Mixing bowls: Using multiple mixing bowls allows you to keep ingredients separate while preparing both the cake and frosting efficiently.
Ingredients
For the Cake
- 1 box (15.25 ounce) chocolate cake mix
- 1 cup water
- 1/2 cup vegetable oil
- 3 large eggs
For the Frosting
- 1 cup (2 sticks) unsalted butter, softened
- 4 cups powdered sugar
- 2 tablespoons milk
- 1 teaspoon vanilla extract
- Green gel food coloring
For Decoration
- 1/2 cup assorted Halloween sprinkles (green, black, orange, white)
- 4 witch leg cupcake toppers
How to Make Witch Legs Cake Jar
Step 1: Preheat the Oven
Preheat your oven to 350°F. Grease and flour a 9×13 inch baking pan thoroughly to prevent sticking.
Step 2: Prepare the Chocolate Cake
In a large bowl, combine:
1. The chocolate cake mix,
2. Water,
3. Vegetable oil,
4. Eggs.
Beat with an electric mixer on medium speed for about 2 minutes until well mixed. Pour this batter into your prepared baking pan.
Step 3: Bake the Cake
Bake in the preheated oven for 30-35 minutes. Check if it’s done by inserting a wooden skewer into the center; it should come out clean. After baking, let the cake cool completely in the pan on a wire rack.
Step 4: Crumble the Cake
Once cooled, crumble the entire cake into a large bowl using your hands or forks until it resembles coarse crumbs.
Step 5: Prepare Green Buttercream Frosting
In another large bowl:
1. Beat the softened unsalted butter with an electric mixer until light and fluffy.
2. Gradually add powdered sugar while continuing to beat until fully incorporated.
3. Add milk and vanilla extract; beat until smooth.
4. Add green gel food coloring drop by drop until you achieve your desired vibrant green color.
Step 6: Fill Piping Bag
Transfer your green frosting into a piping bag fitted with a large round tip for easy application later.
Step 7: Assemble the Cake Jars
For each clear jar:
1. Place a layer of crumbled chocolate cake at the bottom.
2. Add a layer of green buttercream frosting using either piping or spooning techniques.
3. Sprinkle about one tablespoon of assorted Halloween sprinkles over this layer.
Step 8: Repeat Layers
Repeat adding another layer of crumbled chocolate cake followed by another layer of green frosting topped again with sprinkles.
Step 9: Finish with Frosting
Top each jar with a generous dollop of green frosting to create swirls or peaks. Sprinkle remaining Halloween sprinkles over this final layer of frosting.
Step 10: Add Witch Leg Toppers
Carefully insert two witch leg cupcake toppers into each dessert jar’s top frosting for that special spooky touch!
How to Serve Witch Legs Cake Jar
These delightful Witch Legs Cake Jars are not just a treat for the taste buds, but they also make for a visually appealing dessert. Here are some fun serving suggestions to elevate your Halloween festivities.
Festive Tablescape
- Use themed tableware to enhance the spooky vibe. Black plates, orange napkins, and cute Halloween decorations will make your dessert stand out.
Individual Treats
- Serve each Witch Legs Cake Jar in its own clear jar. This makes serving easy and allows guests to enjoy their own personal dessert without sharing!
Pair with Halloween Drinks
- Complement these cake jars with themed drinks like witch’s brew punch or spooky cocktails. The combination of flavors will delight your guests.
Creative Garnishes
- Add a sprig of mint or edible glitter on top of the frosting for an extra touch of magic. This small detail can make your dessert even more enchanting.
Kids’ Party Favor
- Wrap individual jars with colorful ribbons and tags as party favors for kids. They’ll love taking home their spooky treat!
Themed Dessert Table
- Create a dessert table featuring various Halloween-themed treats alongside the Witch Legs Cake Jars. This variety will attract attention and tempt all ages.
How to Perfect Witch Legs Cake Jar
Making the perfect Witch Legs Cake Jar is all about technique and presentation. Follow these tips to ensure your dessert turns out beautifully every time.
- Use fresh ingredients: Fresh eggs and quality butter can make a noticeable difference in flavor.
- Achieve the right frosting consistency: If the frosting is too thick, add more milk; if too thin, add powdered sugar until it reaches the desired texture.
- Layer carefully: Use a piping bag for more precise layering of frosting. This helps create visually appealing layers in each jar.
- Chill before serving: Let the assembled jars chill in the fridge for at least 30 minutes before serving. This helps the flavors meld together.
- Be creative with toppings: Experiment with different sprinkles or edible decorations that match your theme for added flair.
- Make ahead of time: These jars can be prepared a day in advance, making them perfect for busy party hosts.
Best Side Dishes for Witch Legs Cake Jar
Pairing delicious sides with your Witch Legs Cake Jars can create a well-rounded dining experience. Here are some fantastic side dish ideas that complement this festive treat.
- Pumpkin Soup – A warm and comforting soup that adds seasonal flavor to your meal.
- Spooky Cheese Platter – Include themed cheeses, crackers, and fruits for an easy yet elegant side.
- Candied Apples – Sweet yet tart, these treats echo the Halloween spirit beautifully.
- Mummy Hot Dogs – Fun and kid-friendly, these savory bites are sure to please both young and old.
- Ghostly Mashed Potatoes – Creamy potatoes shaped into ghost figures make for an adorable side dish.
- Witch’s Broomsticks – Pretzel rods wrapped with cheese strips create a fun snack that ties into your theme.
- Roasted Pumpkin Seeds – A crunchy snack that provides a healthy option alongside sweets.
- Monster Veggie Platter – Arrange veggies to look like monsters; serve with a tasty dip for added flavor!
Common Mistakes to Avoid
When making your Witch Legs Cake Jar, it’s easy to slip up. Here are some common mistakes to watch for.
- Not cooling the cake completely: If you don’t let the cake cool completely, it can turn mushy when crumbled. Ensure it cools on a wire rack before crumbling.
- Overmixing the frosting: Overmixing can make your frosting too thin. Mix just until combined and fluffy for the best texture.
- Skipping layers: For the perfect presentation, don’t skip layering the cake and frosting. Each jar should have distinct layers for visual appeal.
- Using stale sprinkles: Fresh sprinkles add color and fun! Always check that your Halloween sprinkles are fresh and vibrant before using them.
- Ignoring serving suggestions: These jars are best served chilled or at room temperature. Avoid serving them directly out of the refrigerator for optimal taste.
Refrigerator Storage
- Store in airtight containers to keep them fresh.
- They last up to 3-5 days in the refrigerator.
- Keep jars away from strong odors to avoid flavor transfer.
Freezing Witch Legs Cake Jar
- Freeze jars with lids or plastic wrap securely covering them.
- They can be frozen for up to 1 month without losing quality.
- Thaw overnight in the refrigerator before serving.
Reheating Witch Legs Cake Jar
- Oven: Preheat to 350°F and warm jars for about 10 minutes. This helps maintain texture.
- Microwave: Heat on low power in short intervals (10-15 seconds) to avoid melting frosting too quickly.
- Stovetop: Place jars in a pan with a little water over low heat. Cover and heat gently until warm.
Frequently Asked Questions
What is a Witch Legs Cake Jar?
A Witch Legs Cake Jar is a festive dessert featuring layers of chocolate cake, green buttercream frosting, and topped with whimsical witch leg decorations.
How do I customize my Witch Legs Cake Jar?
You can customize by adding different colors of frosting or using other cake flavors like vanilla or red velvet for variety.
Can I make these ahead of time?
Yes! You can prepare them a day in advance and store them in the refrigerator until ready to serve.
What other decorations can I use besides witch legs?
Feel free to use other spooky decorations like edible ghosts, bats, or Halloween-themed candies for added fun!
Final Thoughts
These Witch Legs Cake Jars are not only visually appealing but also deliciously fun! Perfect for Halloween parties or any festive gathering, they offer endless customization options. Try different flavors or toppings to make this recipe your own!
Witch Legs Cake Jars
- Total Time: 1 hour 5 minutes
- Yield: Approximately 12 servings 1x
Description
Witch Legs Cake Jars are the perfect Halloween treat that brings together festive fun and delicious flavors. Each jar is filled with layers of moist chocolate cake crumbs and vibrant green buttercream frosting, topped with whimsical witch leg decorations for a playful presentation. These individual dessert jars are not only visually appealing but also simple to make, making them an excellent choice for Halloween parties or any festive gathering. With customizable layers, you can create a unique dessert experience tailored to your taste. Get ready to impress your guests with this delightful treat that combines both spookiness and sweetness!
Ingredients
- 1 box chocolate cake mix
- 1 cup water
- 1/2 cup vegetable oil
- 3 large eggs
- 1 cup unsalted butter (softened)
- 4 cups powdered sugar
- 2 tablespoons milk
- Green gel food coloring
- Assorted Halloween sprinkles
- Witch leg cupcake toppers
Instructions
- Preheat the oven to 350°F and grease a 9×13 inch baking pan.
- In a large bowl, mix chocolate cake mix, water, vegetable oil, and eggs until smooth. Pour into the prepared pan.
- Bake for 30-35 minutes until a skewer comes out clean. Let it cool completely.
- Crumble the cooled cake into coarse crumbs in a large bowl.
- In another bowl, beat softened butter until fluffy, then gradually add powdered sugar, milk, vanilla extract, and green gel food coloring until smooth.
- Fill a piping bag with the green frosting.
- Layer crumbled cake and frosting in clear jars, topping with Halloween sprinkles and witch leg toppers.
- Prep Time: 30 minutes
- Cook Time: 35 minutes
- Category: Dessert
- Method: Baking
- Cuisine: American
Nutrition
- Serving Size: 1 serving
- Calories: 420
- Sugar: 39g
- Sodium: 210mg
- Fat: 22g
- Saturated Fat: 10g
- Unsaturated Fat: 11g
- Trans Fat: 0g
- Carbohydrates: 54g
- Fiber: 1g
- Protein: 4g
- Cholesterol: 70mg